


-
 Liquid error (snippets/product-thumbnail line 113): wrong number of arguments (given 2, expected 1)
 -
 Liquid error (snippets/product-thumbnail line 113): wrong number of arguments (given 2, expected 1)
 -
 Liquid error (snippets/product-thumbnail line 113): wrong number of arguments (given 2, expected 1)
 -
 Liquid error (snippets/product-thumbnail line 113): wrong number of arguments (given 2, expected 1)
 -
 Liquid error (snippets/product-thumbnail line 113): wrong number of arguments (given 2, expected 1)
 -
 Liquid error (snippets/product-thumbnail line 113): wrong number of arguments (given 2, expected 1)
 -
 Liquid error (snippets/product-thumbnail line 113): wrong number of arguments (given 2, expected 1)
 -
 Liquid error (snippets/product-thumbnail line 113): wrong number of arguments (given 2, expected 1)
 -
 Liquid error (snippets/product-thumbnail line 113): wrong number of arguments (given 2, expected 1)
 -
 Liquid error (snippets/product-thumbnail line 113): wrong number of arguments (given 2, expected 1)
 -
 Liquid error (snippets/product-thumbnail line 113): wrong number of arguments (given 2, expected 1)
 -
 Liquid error (snippets/product-thumbnail line 113): wrong number of arguments (given 2, expected 1)
 -
 Liquid error (snippets/product-thumbnail line 113): wrong number of arguments (given 2, expected 1)


Sipeed
Sipeed Tang Primer 20K Development Board
In stock: 1500 available.
Impossible de charger la disponibilité du service de retrait
Share
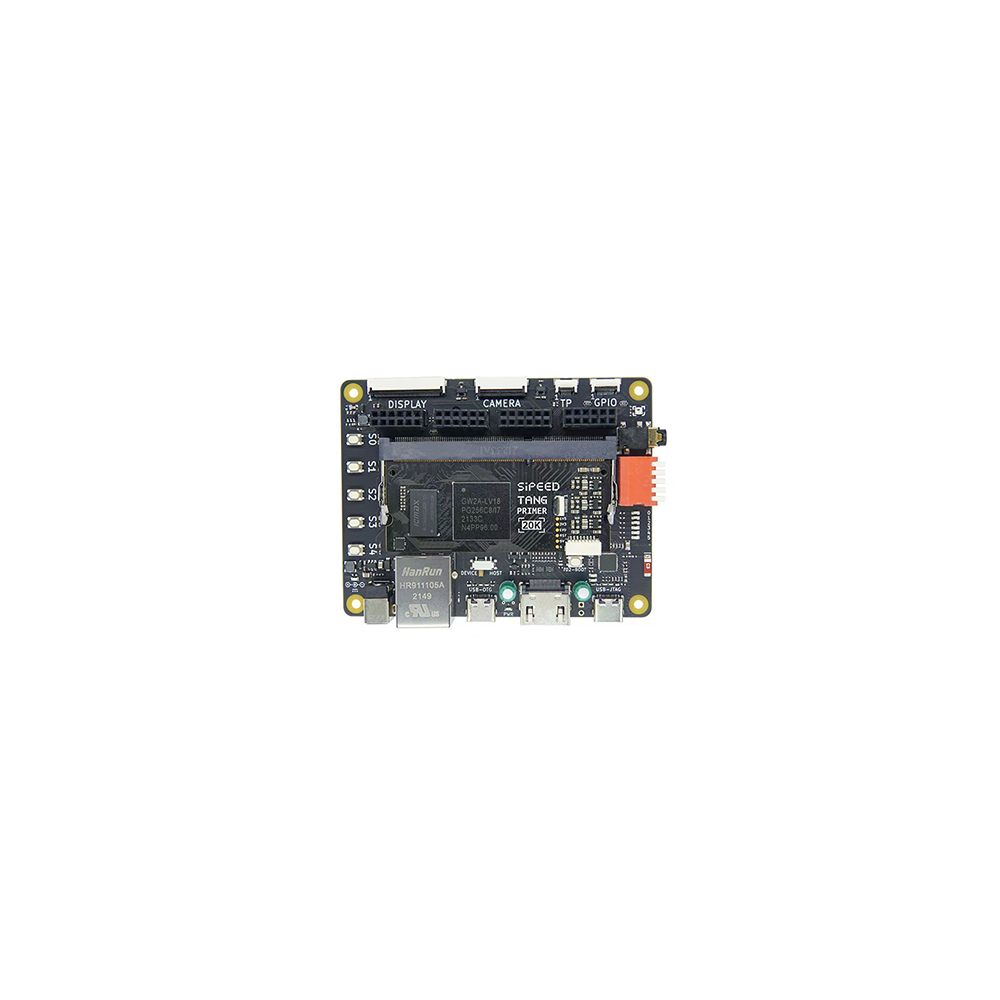


Sipeed Tang Primer 20K GOWIN GW2A FPGA Development Board
1. Introduction
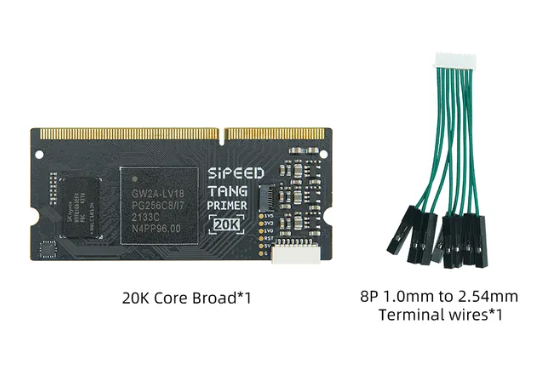
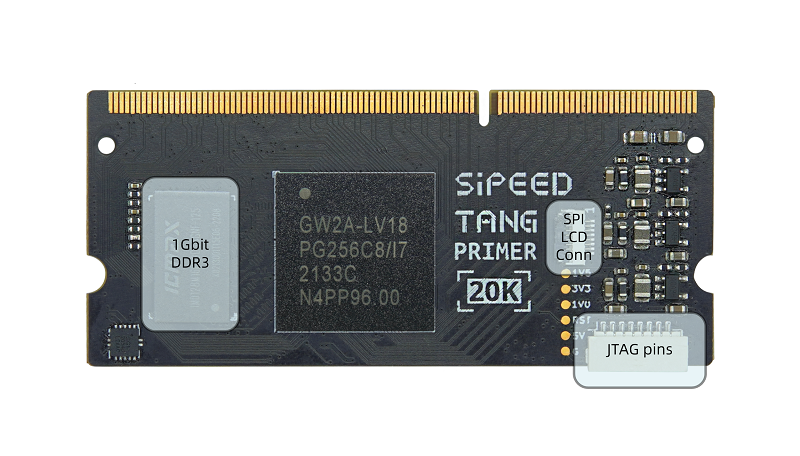
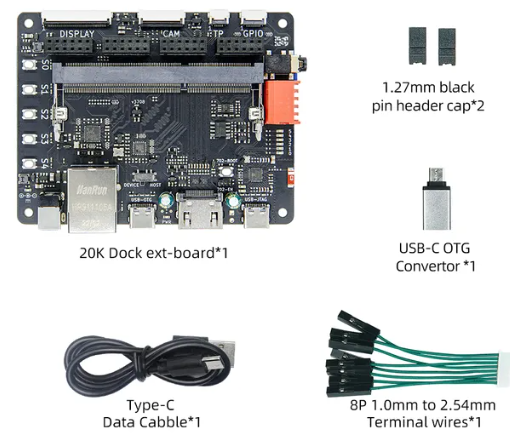
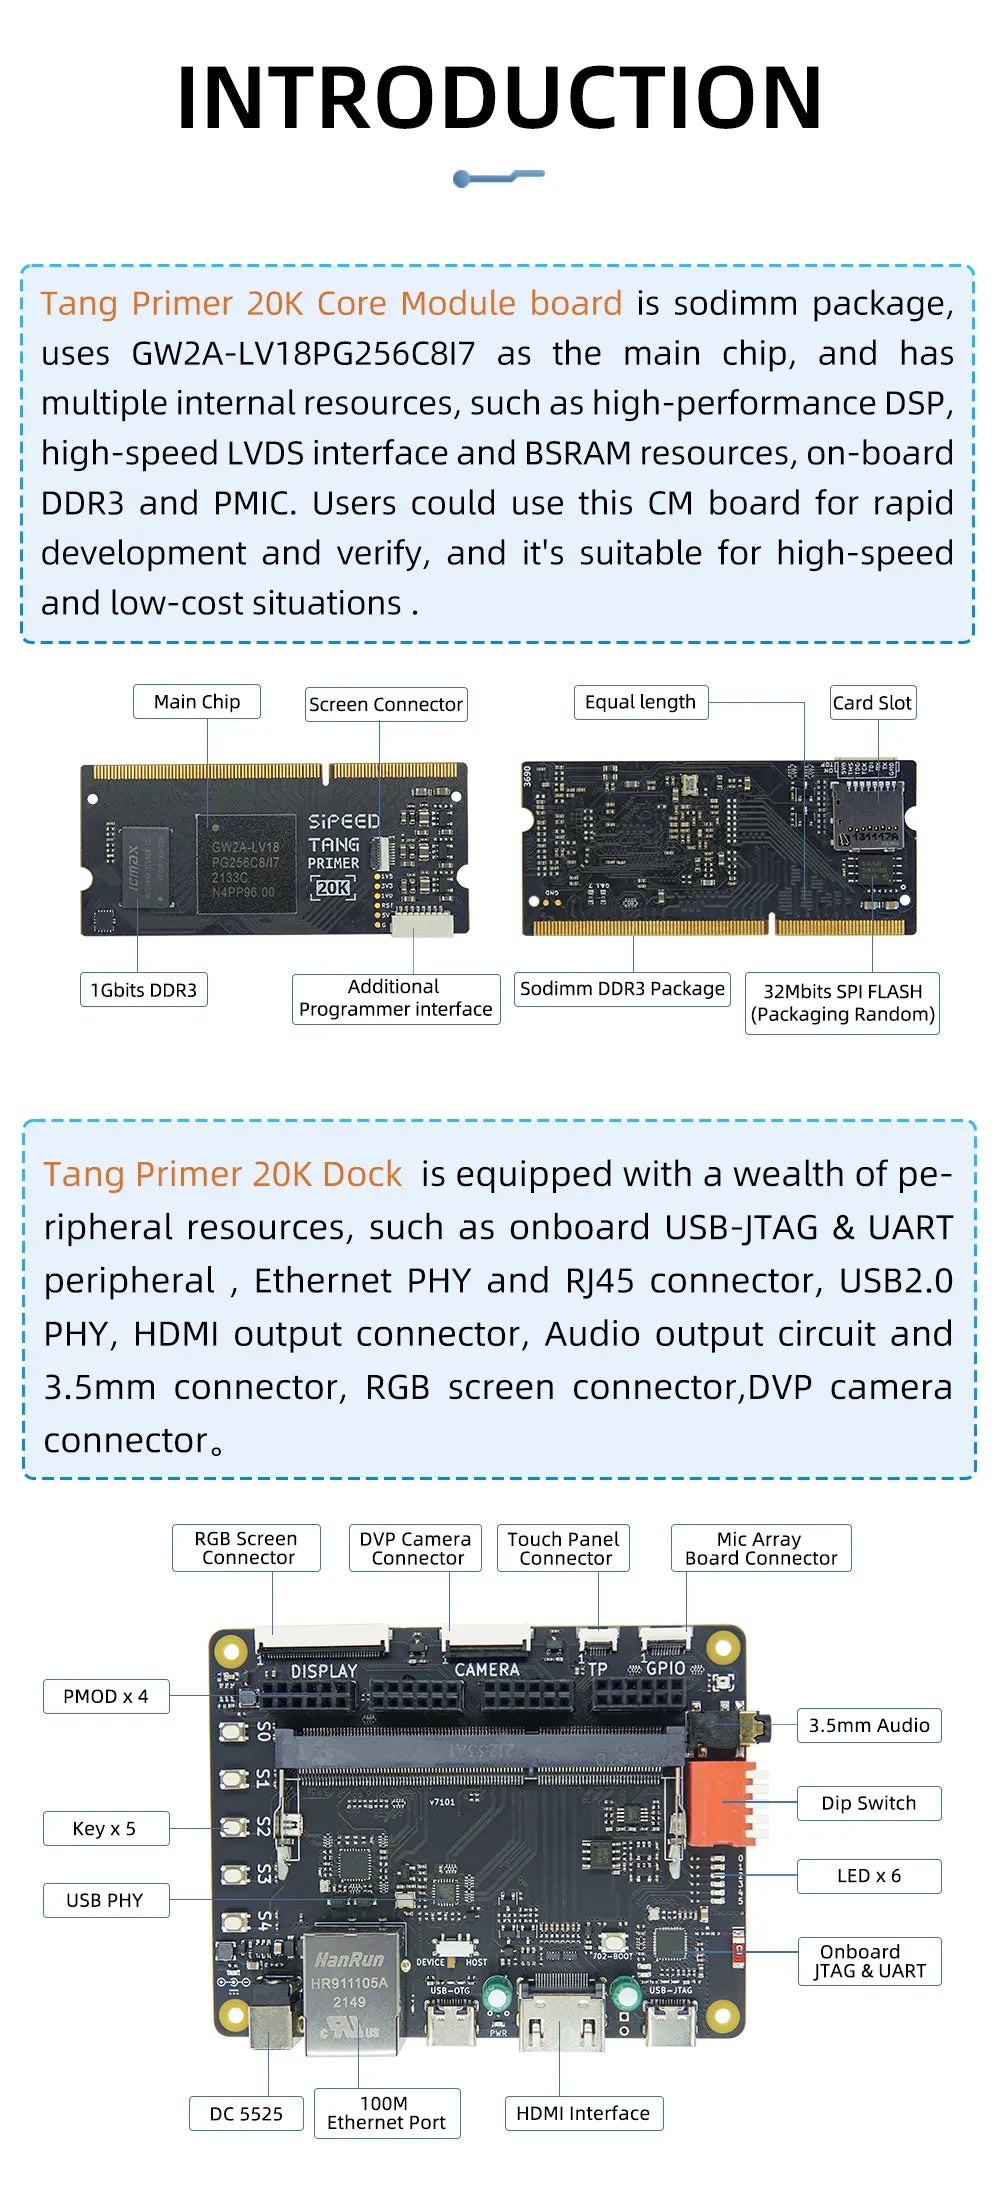
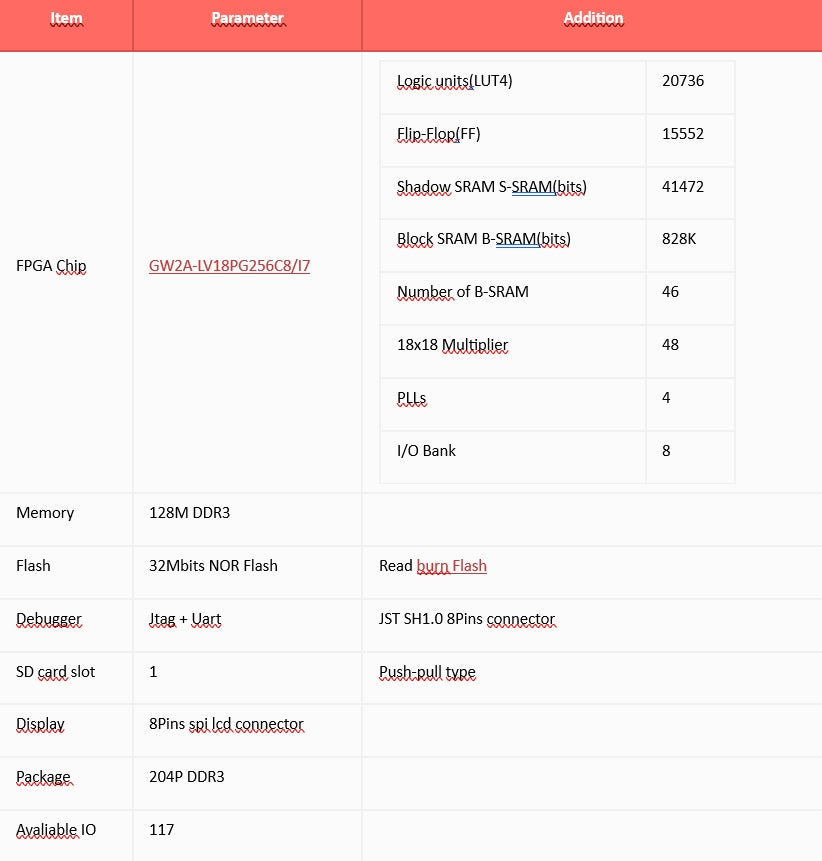
Tang Primer 20K is a core board with DDR3 sodimm shape based on GW2A-LV18PG256C8/I7 as the main chip, with 2 ext-boards are prepared, the Dock and the Lite.
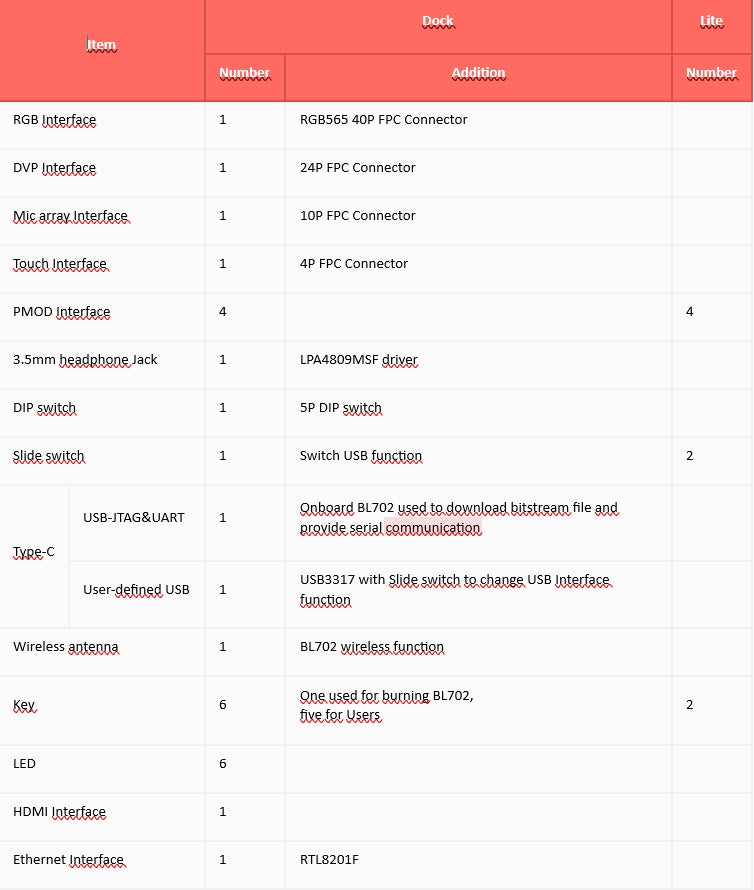
2. Comparison between ext-board
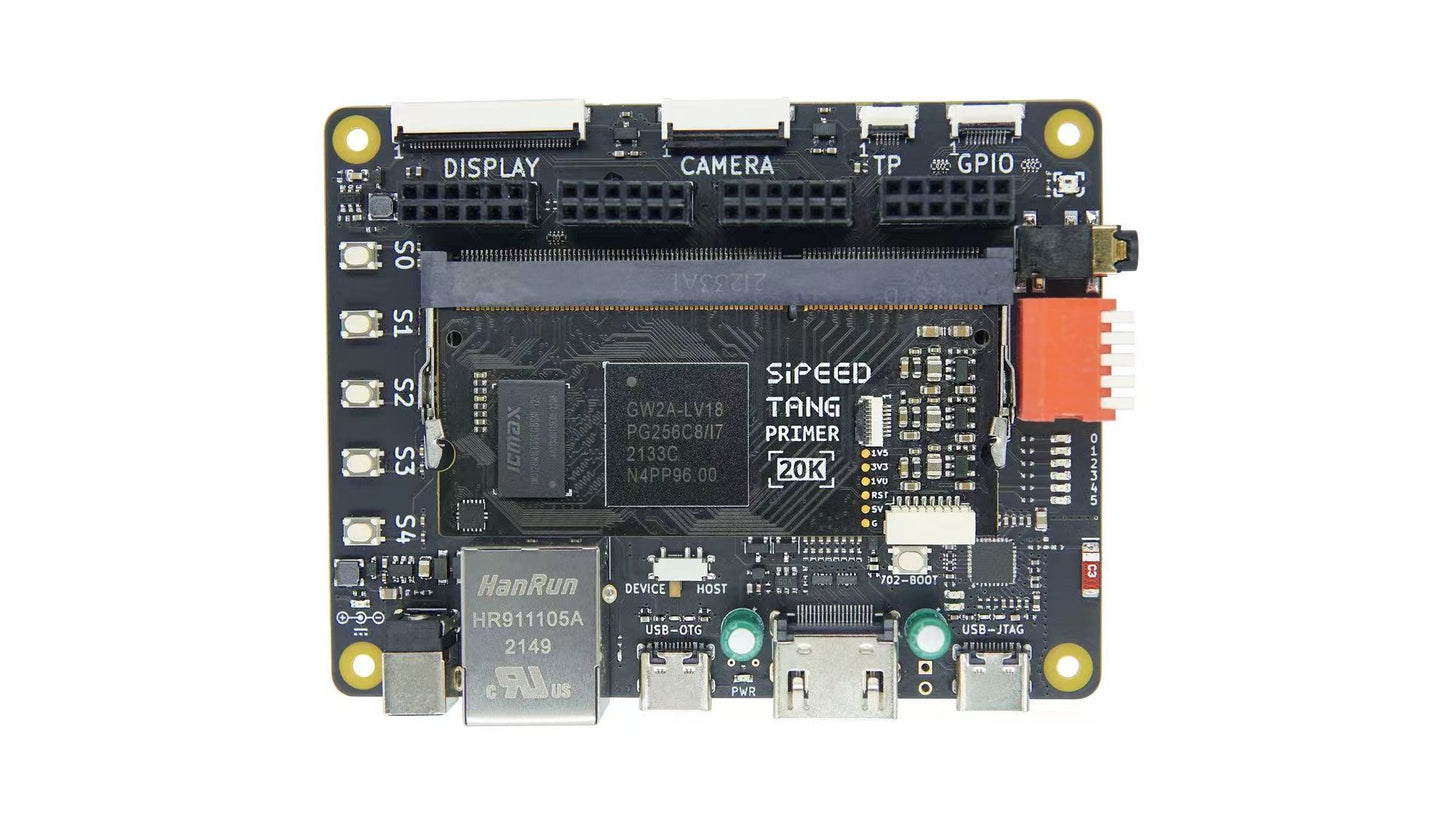
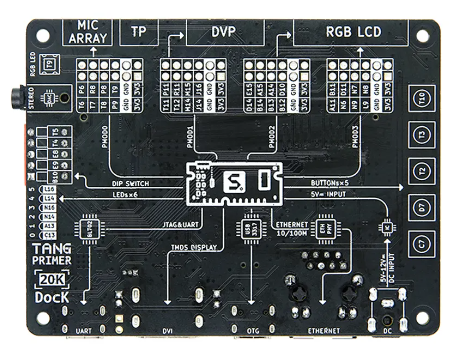
2.1. Dock ext-board appearance
The corresponding pins numbering of LED2 and LED3 is N16 and N14. See the mark on left of the right picture.
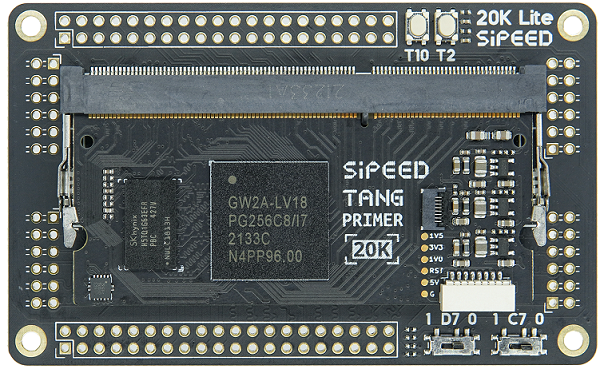
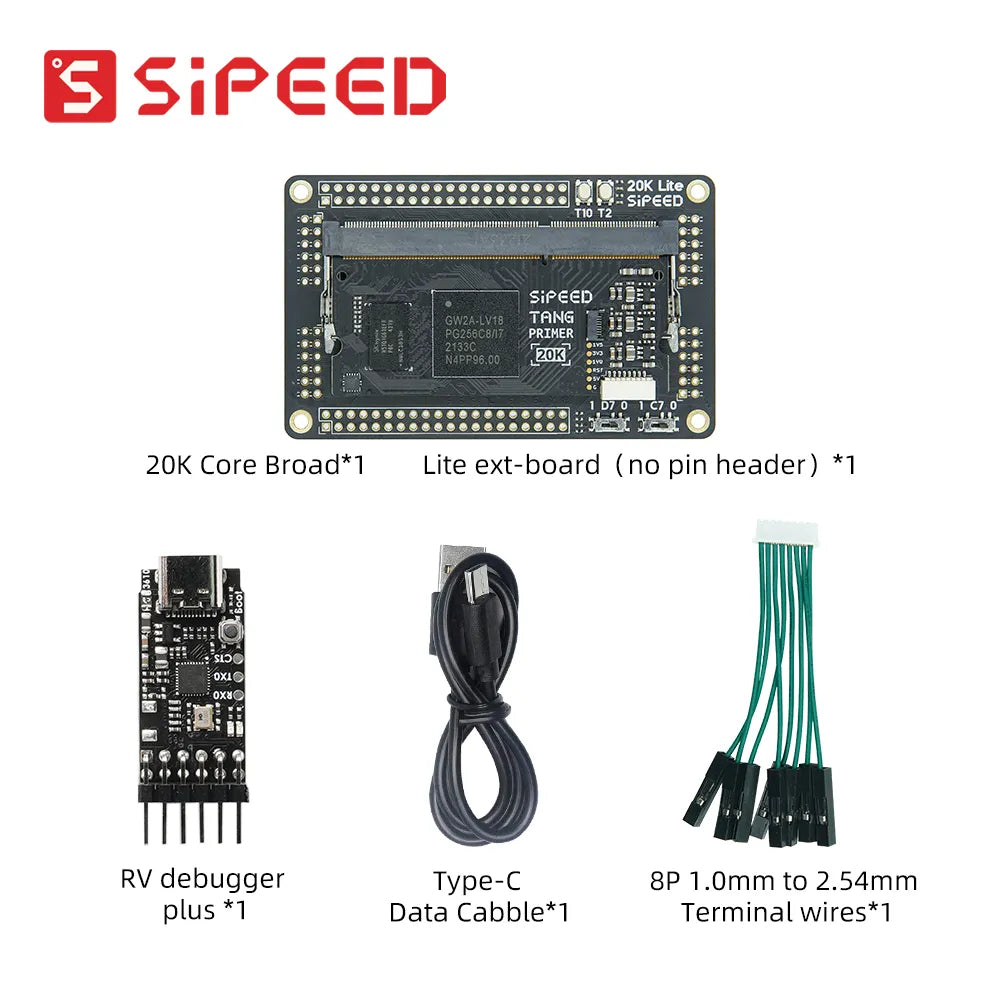
2.2. Lite ext-board appearance
The corresponding pin numbering between R8 and P9 is P8. See the mark on the top left of the right picture.
3. Additional message
Sipeed Tang Primer 20K GOWIN GW2A FPGA Development Board's default bank voltage of bank 0、bank 1、bank 7 on the core board is 3.3V, so their bank IO voltage is 3.3V output. If you want to custom the input IO bank voltage, please remove R5 and R9, see Assembly Click me to see where is R5 and R9.
And the corresponding golden finger on core board are as following:
4. Questions
4.1. Dock ext-board not work
For Sipeed Tang Primer 20K Dock kits, it's necessary to enable the core board before using debugger debug the chip, just put the 1 switch on the dip switch down, otherwise LED0 and LED1 are on and core board dose not work.
|
Enable Core Board |
Disable state |
Additional comments |
|
When disabled, the LDE0 and LED1 is on, and core board doesn't work. |
4.2. How to burn into flash
Do following configurations:
4.3. No reaction after burning or phenomenon is wrong
Make sure you hace selected right device, and all parameters are the same as following.
Then make sure your code logic is right and your
4.4. Successfully burned once, but can't burn after that
Note that the description is there was a successful Flash burnt one time.
In this case, the default reason is that the wrong Dual-Purpose pin is enabled and the debugger can no longer scan the FPGA's JTAG. You can short pin 1 and pin 4 of Flash, by which the chip cannot read FLASH normally when it is powered on.
Besides, if you have dock ext-board, this can be solved by the enable pin of dip switch.
Here are the steps:
First, enable the core board, put the 1 switch on the dip switch down, then do something (like burning FPGA or erasing FPGA) in Programmer application, when the progress bar shows, switch the 1 switch on the dip switch up and down, after which you will find the progress bar works and finish your operations on FPGA.
|
Enable the core board first |
|
|
Do operation on board, when progress bar shows, switch the 1 switch on the dip switch up and down |
|
|
|
put the 1 switch on the dip switch up and down |
|
Progress bar works and finish your operations on fpga |
We have 2 ext-board for Tang Primer 20K, the Dock and the Lite. Here I will tell the start of them.
1. Dock ext-board
1.1. Matters need attention
Here are matters need attention, to avoid spending much time dealing with trouble and fail at last.
1.1.1. Enable Core Board
For Sipeed Tang Primer 20K Dock kits, it's necessary to enable the core board before using debugger debug the chip, just put the 1 switch on the dip switch down, otherwise LED0 and LED1 are on and core board dose not work.
|
Enable Core Board |
Disable state |
Additional comments |
|
When disabled, the LDE0 and LED1 is on, and core board doesn't work. |
1.1.2. Device not work
We have inserted the Core Board into Dock ext-board before delivery, but sometimes we need remove the Core board for some reasons, and after reinserting the Core Board into Dock ext-board, they don't work.
The correct connection steps is to insert the Core board into the ext-board at an Angle roughly as shown in the left figure below. Make sure that the Core board inserted diagonally from above is in uniform contact with the ext-board, which can be judged by the degree of uniformity of the exposed gold finger.
Then gently press the tilted end, you can hear a sound of the Core board being fixed by the ext-board slot.
If you find it difficult to press the tilted end, you can try to polish both sides of the Core board slightly to eliminate the size error caused by the production process.
Just polish the two sides of the red box in the figure above to reduce the difficulty of inserting.
1.1.3. Hardware version introduction
For Dock ext-board, we can know the version of our board from the mark in the following picture.
From the figure we can know the version of this board is V3708.
Here are their errors.
V3708
LED2 and LED3 are marked wrong, thay should be:
|
Name |
Correct mask |
Wrong mask |
|
LED2 |
N16 |
B14 |
|
LED3 |
N14 |
N16 |
1.2. Start to use
For Dock ext-board, the following things can be done with default firmware.
- Press key S0, reset the RGB screen, camera, HDMI signal. And LED3, LED4, LED5 are on.
- Press key S0 to key S5, the state of LED0, lED1, LED2 changes.
- Connect OV5640 camera and 4.3 inch RGB screen with Dock ext-board (Make sure power is off while connecting), the screen display the picture captured by camera. If the screen displays not well, try to press key S0, this will synchronize the camera picture and screen content.
2. Lite ext-board
2.1. Hardware version introduction
For Lite ext-board,we can know the version of our board from the mark in the following picture.
From the figure we can know the version of this board is 3710.
For more information about Sipeed Tang Primer 20K, please contact us.
Specifications
Shipping Policy
Antallia Enterprises Inc., dba Genova Industrial Products
Effective Date: May 28, 2025
Antallia Enterprises Inc., doing business as Genova Industrial Products (“we,” “us,” “our,” or the “Company”), a corporation incorporated under the laws of the State of California, United States, operates the website www.genovaindustrial.com (the “Site”) via the Shopify platform. This Shipping Policy (the “Policy”) governs the processing, shipping, and delivery of orders placed through the Site. By placing an order, you (the “Customer,” “you,” or “your”) agree to be bound by this Policy, which complies with California law (e.g., Cal. Bus. & Prof. Code § 17538), Google Merchant Center requirements, and Shopify’s standards. This Policy is incorporated into our Terms and Conditions, available at [insert link to Terms and Conditions].
Article 1: Order Processing
1.1 Order Confirmation
Upon successful payment, you will receive an order confirmation email containing your Order Number and a summary of your purchase. Please check your spam, junk, or newsletter folders to ensure receipt of the confirmation. If you do not receive the confirmation within 24 hours, contact us as provided in Article 6.
1.2 Processing Timeline
Orders are processed within one (1) to two (2) business days from the date of payment confirmation, subject to payment verification and inventory availability. Business days exclude weekends and U.S. federal holidays observed in California.
1.3 Shopify Integration
Order processing is facilitated through Shopify Inc.’s e-commerce platform, which may affect processing times due to system dependencies or updates. We are not liable for delays caused by Shopify’s platform, provided we meet our processing obligations under California law.
Article 2: Shipping Locations and Delivery Times
2.1 Shipping Locations
We currently ship to all addresses within the United States and Canada. Following Google Merchant Center approval, we plan to expand shipping to additional countries, subject to compliance with international regulations. A list of available shipping destinations is provided at checkout.
2.2 Estimated Delivery Times
- Standard Delivery: Orders are delivered within three (3) to five (5) business days after processing, resulting in a total delivery time of four (4) to seven (7) business days from the date of purchase.
- Remote Areas: Deliveries to remote or rural areas may require an additional two (2) to three (3) business days.
- International Orders: For Canada and future international destinations, delivery times may vary due to customs clearance, which may add three (3) to seven (7) business days.
2.3 Delivery Disruptions
Delivery times are estimates and may be affected by unforeseen events, including but not limited to postal delays, extreme weather, customs inspections, or carrier issues. We will notify you promptly via email or phone (using the contact information provided at checkout) of any significant delays, in compliance with Cal. Bus. & Prof. Code § 17538.
Article 3: Shipping Carriers and Costs
3.1 Carriers
Orders utilizing Global Express shipping are delivered by reputable carriers such as DHL or FedEx. Standard shipping may use other carriers (e.g., USPS, UPS), as determined at our discretion and indicated at checkout.
3.2 Shipping Costs
Shipping costs are calculated at checkout based on the destination, weight, and selected shipping method. Costs are displayed transparently before order confirmation, in compliance with Google Merchant Center’s pricing transparency requirements.
3.3 Customs and Duties
For international orders (e.g., Canada or future destinations), Customers are responsible for any applicable customs duties, taxes, or fees imposed by the destination country. We will provide necessary documentation to facilitate customs clearance but are not liable for delays or costs arising from customs processes.
Article 4: Order Tracking and Insurance
4.1 Tracking
All orders are trackable via a tracking number provided upon shipment. You may monitor your order’s progress on our Order Tracking page at [insert link to tracking page] or through the carrier’s website. Tracking information is sent to the email provided at checkout.
4.2 Insurance
All orders are insured against loss or damage during transit, up to the order’s total value. If an order is lost or damaged, contact us within seven (7) days of the estimated delivery date to initiate a claim, as provided in Article 6.
Article 5: Address Accuracy and Changes
5.1 Customer Responsibility
You are responsible for providing accurate and complete shipping address information at the time of order placement. We are not liable for delays, losses, or non-delivery resulting from incorrect or incomplete addresses.
5.2 Address Changes
Address changes are not permitted after an order has been shipped. If an order is returned to us due to an incorrect address, you assume responsibility for the loss. We will not refund or replace such orders unless the error is attributable to us (e.g., processing errors). In such cases, we will reship or refund in accordance with our Return Policy, available at [insert link to Return Policy].
Article 6: Contact Information and Dispute Resolution
6.1 Inquiries
For shipping-related inquiries or assistance, contact our Customer Support team at:
Email: sales@genovaindustrial.com
Mail: Antallia Enterprises Inc., 5055 Canyon Crest Dr, Ste 123, Riverside, CA 92507, United States
Phone: +1 213 476 7269
We will respond to inquiries within two (2) business days, in compliance with California consumer protection standards.
6.2 Complaints and Escalation
If you are not satisfied with our response to a shipping-related complaint, you may escalate the matter to:
- United States: Federal Trade Commission (https://www.ftc.gov) or Better Business Bureau (https://www.bbb.org).
- International: Your local consumer protection authority (e.g., Canada’s Office of Consumer Affairs or, for future EU markets, the European Consumer Centre).
6.3 Dispute Resolution
Any disputes arising from this Policy shall be resolved through good-faith negotiation. If unresolved, disputes shall be subject to the exclusive jurisdiction of the state or federal courts in Riverside County, California, unless otherwise required by mandatory consumer protection laws in your jurisdiction (e.g., EU Consumer Rights Directive for EU residents).
Article 7: Google Merchant Center Compliance
7.1 Policy Standards
To comply with Google Merchant Center requirements, we ensure:
- Transparent disclosure of shipping costs, delivery times, and tracking options at checkout.
- Accurate representation of shipping availability and restrictions.
- Secure processing of orders in compliance with PCI DSS standards.
- Clear communication of return and refund procedures, as outlined in our Return Policy.
Article 8: International Shipping Considerations
8.1 Current and Future Markets
We currently ship to the United States and Canada. Upon Google Merchant Center approval, we will expand to additional countries, subject to compliance with local consumer protection laws (e.g., EU Consumer Rights Directive, Canada’s Consumer Protection Act).
8.2 Consumer Rights
For Customers in jurisdictions with mandatory consumer protections (e.g., EU, UK, Canada), additional rights may apply, such as the right to withdraw from a purchase within 14 days for certain online transactions (EU Consumer Rights Directive, Art. 9). We will honor such rights as required by law.
Article 9: Governing Law
9.1 Applicable Law
This Policy is governed by and construed in accordance with the laws of the State of California, United States, without regard to its conflict of law principles, as specified by the client. This includes compliance with Cal. Bus. & Prof. Code § 17538, which mandates timely delivery or notification of delays.
Return and Refund Policy
Antallia Enterprises Inc., dba Genova Industrial Products
Effective Date: May 28, 2025
Antallia Enterprises Inc., doing business as Genova Industrial Products (“we,” “us,” “our,” or the “Company”), a corporation incorporated under the laws of the State of California, United States, operates the website www.genovaindustrial.com (the “Site”) via the Shopify platform. This Return and Refund Policy (the “Policy”) governs the process for returning products purchased through the Site and obtaining refunds, in compliance with California law (e.g., Cal. Civ. Code § 1723), Google Merchant Center requirements, and Shopify’s standards. By placing an order, you (the “Customer,” “you,” or “your”) agree to be bound by this Policy, which is incorporated into our Terms and Conditions, available at [insert link to Terms and Conditions]. We are committed to ensuring customer satisfaction and providing a transparent and efficient return and refund process.
Article 1: Return Eligibility and Timeframe
1.1 Return Period
You may request a return within fourteen (14) calendar days from the date you receive your order, in accordance with Cal. Civ. Code § 1723 and, for international customers, applicable consumer protection laws (e.g., EU Consumer Rights Directive, Art. 9). Opening the product’s outer packaging does not affect return eligibility, provided the item meets the conditions outlined in Article 1.2.
1.2 Eligibility Conditions
To qualify for a return, the following conditions must be met:
- Return Merchandise Authorization (RMA): You must initiate an RMA request by contacting us at sales@genovaindustrial.com. Upon approval, we will provide an RMA number and a prepaid return shipping label with instructions.
- Condition: The item must be unused, in the same condition as received, and suitable for resale, with only minimal handling (e.g., testing) permitted.
- Proof of Purchase: You must provide the order number, receipt, or other proof of purchase (e.g., confirmation email).
- Packaging: The item must be returned in its original packaging or equivalent protective packaging to ensure safe transit.
1.3 Non-Returnable Items
The following items are not eligible for return:
- Gift cards or digital vouchers.
- Products explicitly designated as non-returnable at the time of purchase (e.g., clearance items, if applicable).
If you are unsure about an item’s eligibility, contact us for clarification as provided in Article 5.
Article 2: Return Process
2.1 Initiating a Return
To initiate a return, contact our Customer Support team at sales@genovaindustrial.com with your order number and reason for return. If approved, we will provide an RMA number, a prepaid return shipping label, and instructions for mailing or dropping off the package at a designated carrier location (e.g., FedEx). Returns sent without an RMA number may be rejected.
2.2 Shipping Costs
We will cover return shipping costs for eligible returns, provided you use the prepaid shipping label provided. If you choose an alternative shipping method, you are responsible for the associated costs, unless the return is due to our error (e.g., defective or incorrect item).
2.3 Return Submission
Return the item within seven (7) calendar days of receiving the RMA and shipping label. Packages must be sent to:
Antallia Enterprises Inc., 5055 Canyon Crest Dr, Ste 123, Riverside, CA 92507, United States.
Article 3: Damages, Defects, and Incorrect Items
3.1 Inspection Requirement
You must inspect your order upon receipt. If an item is defective, damaged, or incorrect, contact us within seven (7) calendar days of delivery at sales@genovaindustrial.com. We will evaluate the issue and, if verified, provide a prepaid return label or replacement at no cost, in accordance with Cal. Civ. Code § 1723.
3.2 Remedies
For defective, damaged, or incorrect items, we may, at our discretion:
- Replace the item with an identical or equivalent product, subject to availability.
- Issue a full refund to your original payment method.
- Provide store credit, if agreed upon.
Article 4: Refund Process
4.1 Refund Approval
Upon receiving and inspecting your return, we will notify you via email of the approval or rejection of your refund request. Inspections are completed within three (3) business days of receipt. If rejected, we will provide the reason (e.g., item not in original condition).
4.2 Refund Issuance
Approved refunds will be issued to your original payment method within seven (7) business days of approval, in compliance with Shopify’s payment processing systems. Your bank or credit card issuer may require additional time (typically 5–10 business days) to post the refund to your account. Refunds include the purchase price and any original shipping fees, unless the return is due to customer error (e.g., incorrect address).
4.3 Exchanges
We do not offer direct exchanges. To obtain a different item, initiate a return for the unwanted product and place a new order for the desired item through the Site. This ensures the fastest resolution, as outlined by Google Merchant Center guidelines for clear refund processes.
Article 5: Contact Information and Dispute Resolution
5.1 Customer Support
For return or refund inquiries, contact our Customer Support team at:
Email: sales@genovaindustrial.com
Mail: Antallia Enterprises Inc., 5055 Canyon Crest Dr, Ste 123, Riverside, CA 92507, United States
Phone: +1 213 476 7269
We will respond to inquiries within two (2) business days, in compliance with California consumer protection standards.
5.2 Complaints and Escalation
If you are not satisfied with our response to a return or refund issue, you may escalate the matter to:
- United States: Federal Trade Commission (https://www.ftc.gov) or Better Business Bureau (https://www.bbb.org).
- International: Your local consumer protection authority (e.g., Canada’s Office of Consumer Affairs or, for future EU markets, the European Consumer Centre).
5.3 Dispute Resolution
Any disputes arising from this Policy shall be resolved through good-faith negotiation. If unresolved, disputes shall be subject to the exclusive jurisdiction of the state or federal courts in Riverside County, California, unless otherwise required by mandatory consumer protection laws in your jurisdiction (e.g., EU Consumer Rights Directive for EU residents).
Article 6: Google Merchant Center Compliance
6.1 Policy Standards
To comply with Google Merchant Center requirements, we ensure:
- Transparent disclosure of return and refund eligibility, timeframes, and processes.
- Clear communication of shipping costs for returns (covered by us for eligible returns).
- Timely processing of refunds within seven (7) business days of approval.
- Adherence to consumer protection laws, including Cal. Civ. Code § 1723 and, where applicable, GDPR or EU Consumer Rights Directive.
Article 7: International Return Considerations
7.1 Current and Future Markets
We currently accept returns from the United States and Canada. Upon Google Merchant Center approval, we will expand return services to additional countries, subject to compliance with local consumer protection laws.
7.2 EU/UK Consumer Rights
For Customers in the European Economic Area or United Kingdom, you may have the right to withdraw from a purchase within fourteen (14) calendar days without providing a reason, pursuant to the EU Consumer Rights Directive (Art. 9) or UK Consumer Rights Act 2015. To exercise this right, contact us within the 14-day period. You are responsible for return shipping costs unless the item is defective or incorrect, in which case we will cover the costs.
7.3 International Customs and Duties
For international returns, Customers are responsible for any customs duties or fees associated with returning the item, unless the return is due to our error. We will provide necessary documentation to facilitate customs clearance.
Article 8: Governing Law
8.1 Applicable Law
This Policy is governed by and construed in accordance with the laws of the State of California, United States, without regard to its conflict of law principles, as specified by the client. This includes compliance with Cal. Civ. Code § 1723, which governs retail return policies.
Payment Policy
Antallia Enterprises Inc., dba Genova Industrial Products
Effective Date: May 28, 2025
Antallia Enterprises Inc., doing business as Genova Industrial Products (“we,” “us,” “our,” or the “Company”), a corporation incorporated under the laws of the State of California, United States, operates the website www.genovaindustrial.com (the “Site”) via the Shopify platform. This Payment Policy (the “Policy”) governs the acceptance, processing, and handling of payments for orders placed through the Site, in compliance with California law (e.g., Cal. Bus. & Prof. Code § 17414), Google Merchant Center requirements, and Shopify’s standards. By submitting payment, you (the “Customer,” “you,” or “your”) agree to be bound by this Policy, which is incorporated into our Terms and Conditions, available at [insert link to Terms and Conditions]. We are committed to providing secure, transparent, and efficient payment processes to ensure a seamless shopping experience.
Article 1: Accepted Payment Methods
1.1 Payment Options
We offer the following payment methods to facilitate convenient and flexible transactions:
- Credit and Debit Cards: Visa, Mastercard, American Express, Discover, Diners Club.
- Digital Wallets: Amazon Pay, Apple Pay, Meta Pay, Google Pay, Shop Pay.
- Alternative Payment Methods: PayPal, Venmo (via PayPal integration).
1.2 Browser and Device Compatibility
Certain payment methods are subject to browser and device limitations due to Shopify’s payment gateway integrations:
- Apple Pay: Available on Safari browsers running on compatible Apple devices (e.g., iPhone, iPad, Mac). Apple Pay is not supported on non-Safari browsers (e.g., Chrome, Firefox) on Apple devices, as per Shopify’s integration specifications.
- Venmo: Available indirectly through PayPal integration on mobile Chrome browsers on iOS devices with the Venmo app installed. Venmo is not supported on Safari or other browsers lacking PayPal-Venmo integration.
Customers are responsible for ensuring their browser and device meet the requirements for their chosen payment method. We are not liable for unavailability of payment methods due to browser or device incompatibilities.
Article 2: Payment Processing
2.1 Secure Transactions
All payments are processed securely using industry-standard encryption protocols, in compliance with Payment Card Industry Data Security Standards (PCI DSS). We do not store credit card or payment details on our servers after transaction completion, except as required for order processing or legal compliance (e.g., tax records).
2.2 Order Confirmation
Upon successful payment, you will receive an order confirmation email containing your order number and purchase details. Retain this confirmation for your records. If you do not receive the confirmation within 24 hours, check your spam, junk, or newsletter folders or contact us as provided in Article 5.
2.3 Shopify Payment Gateway
Payments are processed through Shopify’s secure payment gateways, which may include third-party providers (e.g., Stripe, PayPal). Processing times are subject to Shopify’s systems and third-party provider policies, typically completing within one (1) business day.
Article 3: Payment Issues and Troubleshooting
3.1 Common Issues
If you encounter payment issues (e.g., declined transactions, technical errors), follow these steps:
- Verify that your payment method is listed in Article 1.1 and supported by your browser/device.
- Ensure billing information matches the details associated with your payment method.
- Confirm sufficient funds or credit are available.
- For digital wallets (e.g., Apple Pay, Google Pay), verify that the wallet is correctly configured.
3.2 Support for Payment Issues
If issues persist, contact our Customer Support team at sales@genovaindustrial.com or +1 213 476 7269. We will respond within two (2) business days to assist with resolution, in compliance with California consumer protection standards.
Article 4: Transaction and Related Fees
4.1 No Additional Fees by Company
We do not charge additional fees for using any of the accepted payment methods listed in Article 1.1.
4.2 Third-Party Fees
Your bank, credit card issuer, or payment provider may impose fees, such as international transaction fees or currency conversion fees, particularly for international orders. These fees are independent of our store, and you are responsible for contacting your financial institution for details. We will display the transaction currency (e.g., USD) at checkout for transparency, as required by Google Merchant Center.
Article 5: Fraud Prevention
5.1 Verification Process
To ensure a secure shopping environment, all transactions are subject to fraud prevention and verification checks. We may contact you via email or phone (using the contact information provided at checkout) to verify transaction details if discrepancies are detected. Orders may be delayed or canceled if verification is not completed, in compliance with Cal. Bus. & Prof. Code § 17414.
5.2 Liability for Fraud
You are responsible for ensuring the accuracy and legitimacy of your payment information. We are not liable for losses resulting from unauthorized use of your payment method, provided we have implemented reasonable security measures.
Article 6: Refunds
6.1 Refund Process
Refunds are issued to the original payment method within seven (7) business days of approval, as detailed in our Return and Refund Policy, available at [insert link to Return and Refund Policy]. Refunds may take an additional 5–10 business days to appear in your account, depending on your bank or payment provider.
6.2 Shopify Refund Processing
Refunds are processed through Shopify’s payment gateways, which may affect processing times. We are not liable for delays caused by Shopify or third-party payment providers, provided we initiate the refund within the specified timeframe.
Article 7: Google Merchant Center Compliance
7.1 Policy Standards
To comply with Google Merchant Center requirements, we ensure:
- Transparent disclosure of accepted payment methods and associated fees at checkout.
- Secure payment processing in compliance with PCI DSS standards.
- Clear refund procedures, as outlined in our Return and Refund Policy.
- Adherence to consumer protection laws, including Cal. Bus. & Prof. Code § 17414 and, where applicable, GDPR or EU Payment Services Directive (PSD2).
Article 8: International Payment Considerations
8.1 Current and Future Markets
We currently accept payments for orders shipped to the United States and Canada. Upon Google Merchant Center approval, we will expand to additional countries, subject to compliance with local payment regulations (e.g., EU Payment Services Directive, Canada’s Payments Canada rules).
8.2 Currency and Conversion
All transactions are processed in U.S. dollars (USD) unless otherwise specified at checkout. For international orders, your payment provider may apply currency conversion rates, which are your responsibility. We will display the transaction currency clearly before payment confirmation.
8.3 EU/UK Consumer Protections
For Customers in the European Economic Area or United Kingdom, additional payment protections may apply under the EU Payment Services Directive (PSD2) or UK equivalent, including strong customer authentication requirements. We will comply with such regulations as applicable.
Article 9: Contact Information and Dispute Resolution
9.1 Customer Support
For payment-related inquiries or assistance, contact our Customer Support team at:
Email: sales@genovaindustrial.com
Mail: Antallia Enterprises Inc., 5055 Canyon Crest Dr, Ste 123, Riverside, CA 92507, United States
Phone: +1 213 476 7269
We will respond to inquiries within two (2) business days, in compliance with California consumer protection standards.
9.2 Complaints and Escalation
If you are not satisfied with our response to a payment-related issue, you may escalate the matter to:
- United States: Federal Trade Commission (https://www.ftc.gov) or Better Business Bureau (https://www.bbb.org).
- International: Your local consumer protection authority (e.g., Canada’s Office of Consumer Affairs or, for future EU markets, the European Consumer Centre).
9.3 Dispute Resolution
Any disputes arising from this Policy shall be resolved through good-faith negotiation. If unresolved, disputes shall be subject to the exclusive jurisdiction of the state or federal courts in Riverside County, California, unless otherwise required by mandatory consumer protection laws in your jurisdiction (e.g., EU Payment Services Directive for EU residents).
Article 10: Governing Law
10.1 Applicable Law
This Policy is governed by and construed in accordance with the laws of the State of California, United States, without regard to its conflict of law principles, as specified by the client. This includes compliance with Cal. Bus. & Prof. Code § 17414, which governs payment processing obligations.